Learn how to use Emergent AI to create a fully functional website in 2026 — no coding required. This step-by-step tutorial covers prompts, building, refining, and deploying your site live.
How to Use Emergent AI: Create a Website in 2026 (Step-by-Step Tutorial)
How to Use Emergent AI to Build a Website Without Writing a Single Line of Code
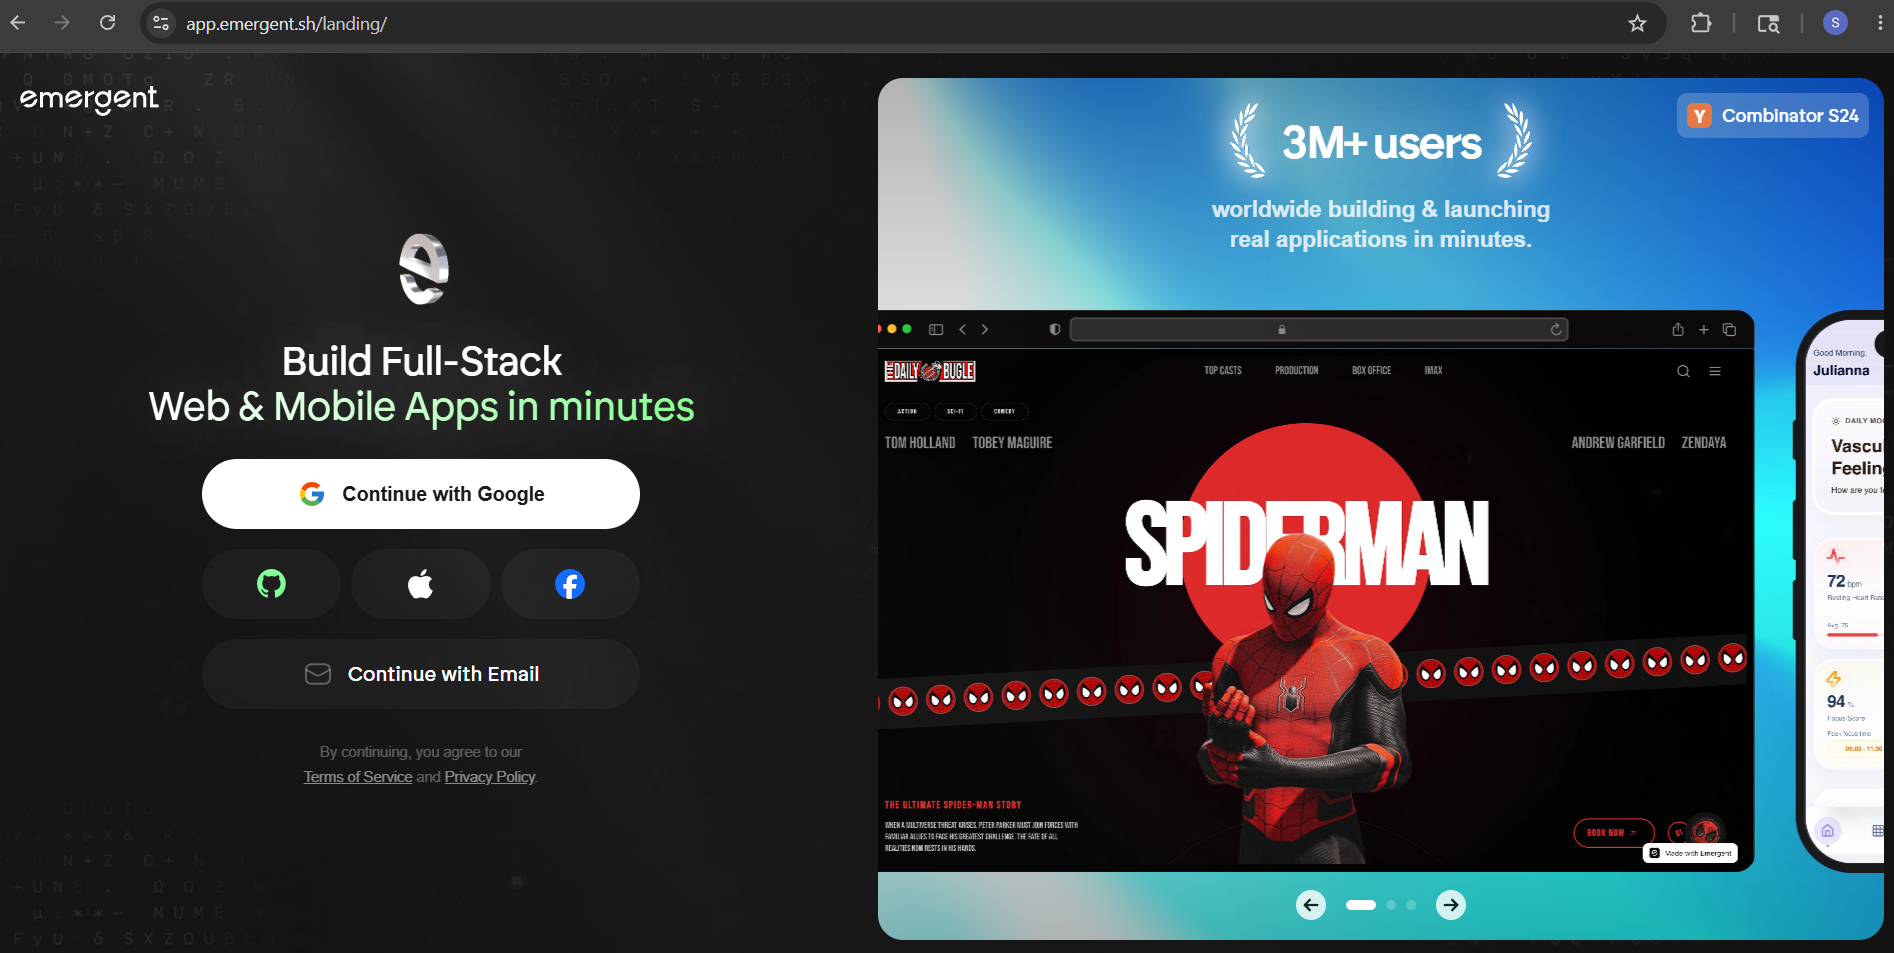
If you have been searching for how to use Emergent AI to build a website in 2026, you are in exactly the right place. Emergent AI is the fastest, most powerful way to go from a blank page to a fully live website — without writing a single line of code, without hiring a developer, and without spending weeks learning design tools.
In this complete step-by-step tutorial, we are going to walk through exactly how to use Emergent AI from start to finish. By the time you reach the end of this guide, you will know how to sign up, how to write the perfect prompt, how to build and refine your site, and how to deploy it live on the internet — all in one sitting.
Whether you are a complete beginner or someone who has tried other website builders and hit a wall, this guide on how to use Emergent AI is written for you.
No jargon. No developer. No guesswork. Let us build.

What You Will Learn in This Tutorial
- What Is Emergent AI and Why It Is Different From Every Other Website Builder
- How to Use Emergent AI — Step 1: Sign Up for Free
- How to Use Emergent AI — Step 2: Getting Familiar With the Dashboard
- How to Use Emergent AI — Step 3: Writing Your First Website Prompt
- How to Use Emergent AI — Step 4: Watch It Build Your Website in Real Time
- How to Use Emergent AI — Step 5: Preview and Review What Was Built
- How to Use Emergent AI — Step 6: Refining Your Website With Follow-Up Prompts
- How to Use Emergent AI — Step 7: Advanced Controls and Settings
- How to Use Emergent AI — Step 8: Adding Powerful Integrations
- How to Use Emergent AI — Step 9: Running a Pre-Deployment Health Check
- How to Use Emergent AI — Step 10: Deploying Your Website Live
- How to Use Emergent AI — Step 11: Connecting a Custom Domain
- Pro Tips for Getting the Best Results When You Use Emergent AI
- Emergent AI Pricing — What Is Free and What Is Paid
- Real Websites You Can Build When You Learn How to Use Emergent AI
What Is Emergent AI and Why Is Everyone Talking About It in 2026?
Before we get into how to use Emergent AI step by step, let us make sure we understand what makes this tool so different from everything else available today.
You have probably heard of Wix, Squarespace, and GoDaddy. Those are drag-and-drop website builders. They give you a template, you move things around, and eventually you have something that looks like a website. They work fine for the simplest pages. But the moment you need anything more complex — a user login, a database, a checkout flow, or an AI-powered feature — you hit a wall immediately.
Learning how to use Emergent AI is a completely different experience.
When you use Emergent AI, you do not drag and drop anything. You type a plain English description of the website you want, and Emergent’s AI agents write real code for you. Python on the backend. React on the frontend. A fully functional, production-ready web application — not a template, not a mockup, a real working website.
According to Emergent’s own documentation at emergent.sh, the platform is designed to compress weeks of planning, development, and deployment into a single guided conversation. That is not marketing language. That is genuinely what happens when you learn how to use Emergent AI correctly.
Here is what sets Emergent AI apart from every other builder on the market today:
Most AI builders only generate layout and design. When you use Emergent AI, you get the full front-end, back-end, and database generated together in one workflow. Most builders lock your site into their proprietary code. Emergent AI outputs real exportable code that you own completely. User authentication on most platforms is a limited or expensive add-on. With Emergent AI, it is built in with a single prompt. Database setup on other platforms requires technical knowledge. Emergent AI auto-generates it with proper schemas automatically. And while other builders make you drag and drop, Emergent AI simply lets you talk to it in natural language.
Think of how to use Emergent AI like having an entire development team inside your browser. One that works instantly, costs a fraction of what a real developer would charge, and never needs a coffee break.
Who should learn how to use Emergent AI? Entrepreneurs, freelancers, marketers, content creators, startup founders, course sellers, and small business owners — basically anyone who has a website idea and zero desire to write code.
How to Use Emergent AI — Step 1: Sign Up for Free
The first step in learning how to use Emergent AI is creating your account. The good news is you do not need a credit card to get started. Emergent offers a free tier that gives you access to the full platform so you can explore every feature before spending anything.
Here is exactly what to do:
Open your browser and go to emergent.sh
Click the “Get Started” or “Start Building” button on the homepage
Sign up using your Google account for one-click access, or enter your email address and create a password
Verify your email if prompted
You will be taken straight into your Emergent AI dashboard — and that is where the fun begins
Free Plan Note: The Emergent AI free tier gives you 10 credits per month. That is enough to explore the interface and run a small test build. Most people who want to build a real website will want the Standard plan at $20 per month for 100 credits. We will cover pricing in detail later in this guide on how to use Emergent AI.
How to Use Emergent AI — Step 2: Getting Familiar With the Dashboard
Once you log in, you will land on the Emergent AI dashboard. This is your home base for everything. It is clean, minimal, and honestly refreshing compared to cluttered tools like Wix or WordPress. Let us spend 60 seconds understanding what you are looking at before we start building.
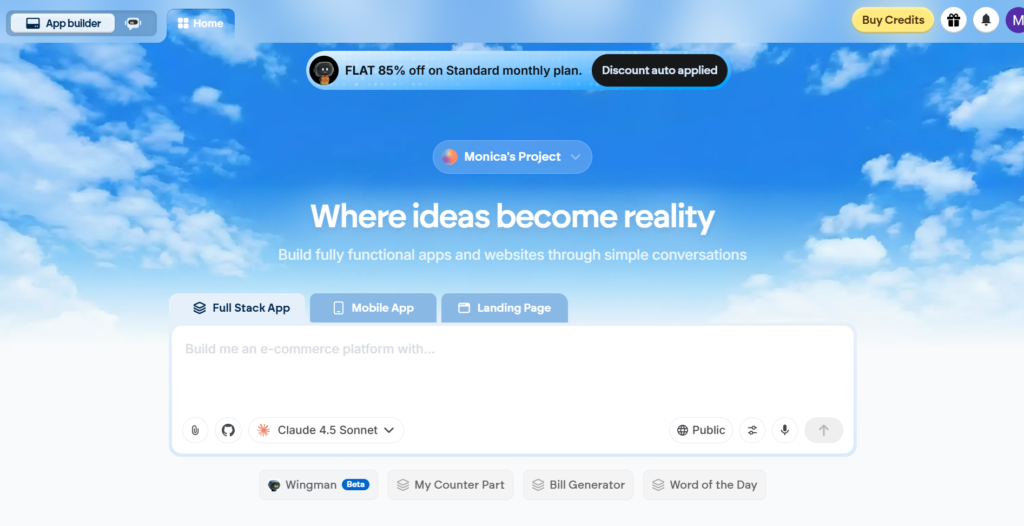
Here is a quick breakdown of the main areas you will see when you use Emergent AI:
The Projects Area is where all your websites and apps live. You can switch between multiple projects here easily.
The New Project Button is where everything begins. This is the button you will click whenever you want to start a new website build with Emergent AI.
The Credit Counter shows how many credits you have used this month and how many you have remaining. Keeping an eye on this is important.
Settings and Profile lets you manage your billing, connect GitHub, set up API keys, and control your account preferences.
The Community and Tutorials section has example builds and step-by-step guides to inspire your next project when you use Emergent AI.
You do not need to configure anything right now. Just get comfortable with the layout — then let us get into the most important part of how to use Emergent AI: writing your prompt.
How to Use Emergent AI — Step 3: Writing Your First Website Prompt the Right Way
This is the most critical step in the entire process of how to use Emergent AI. Everything the AI builds comes directly from the prompt you give it. Think of your prompt as the brief you would hand to a development team — the clearer and more detailed it is, the better your website will turn out.
Here is how to start a new project:
From your dashboard, click “New Project” or “Start Building”
A prompt box will appear on screen — this is where you describe your website in plain English
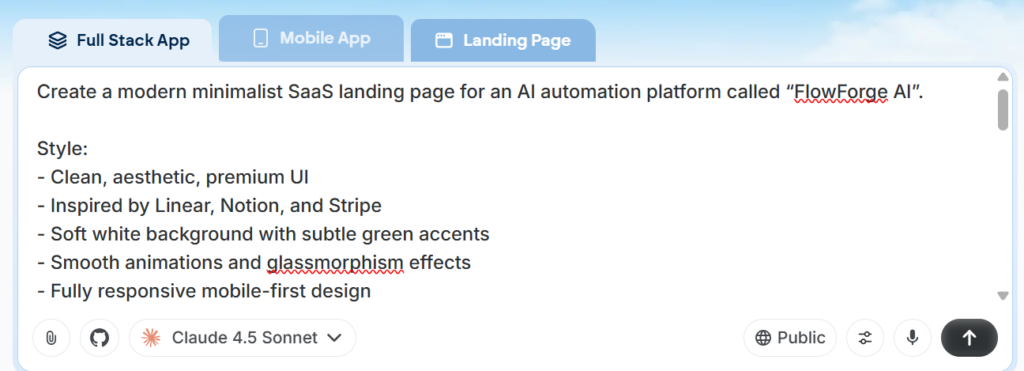
What makes a great prompt when you use Emergent AI?
The number one mistake beginners make when learning how to use Emergent AI is writing vague prompts. Do not just type “make me a website.” Be specific. Use this formula every time:
Type of website + Who it is for + Main pages and features + Tone and style + Any special features needed
Here are real prompt examples you can copy and adapt right now:
Portfolio Website Prompt:
“Build a personal portfolio website for a freelance graphic designer. Include a homepage with a hero section, an about page, a projects gallery with filterable categories, a testimonials section, and a contact form. Modern, minimal design. Dark mode preferred.”
Small Business Website Prompt:
“Create a website for a local bakery called Sweet Corner. Include a homepage with a hero banner, a menu page with product listings and prices, an about us page, a gallery, and a contact form. Warm, cozy color palette. Mobile responsive.”
Course Landing Page Prompt:
“Build a landing page for an online course called AI for Beginners. Include a hero section with a headline and CTA button, a benefits section, a curriculum breakdown, an instructor bio, testimonials, an FAQ accordion, and a signup form. Clean professional design with bold typography.”
The Golden Rule of How to Use Emergent AI: Vague input equals generic output. Precise input equals a website that actually matches your vision. Take 5 minutes to write a strong prompt — it saves hours of editing later.
How to Use Emergent AI — Step 4: Watch It Build Your Website in Real Time
This is the moment that makes every first-time user’s jaw drop. Once you understand how to use Emergent AI’s generation process, you will never look at website building the same way again.
After you type your prompt and click Generate, Emergent’s AI agents immediately get to work. You can watch it happen live — the chat window on the left side of the screen shows the AI thinking, planning, writing code, and assembling your website step by step in real time. The right panel shows a live preview updating as each section is built.
Here is what to do:
Type your website description in the prompt box
Click the Generate button or press Enter
Watch the left panel — the AI will list every component it is building: pages, navigation, forms, database schema, backend routes
A live preview appears on the right side as sections are completed
Wait for the full build to complete — this typically takes 2 to 5 minutes depending on complexity
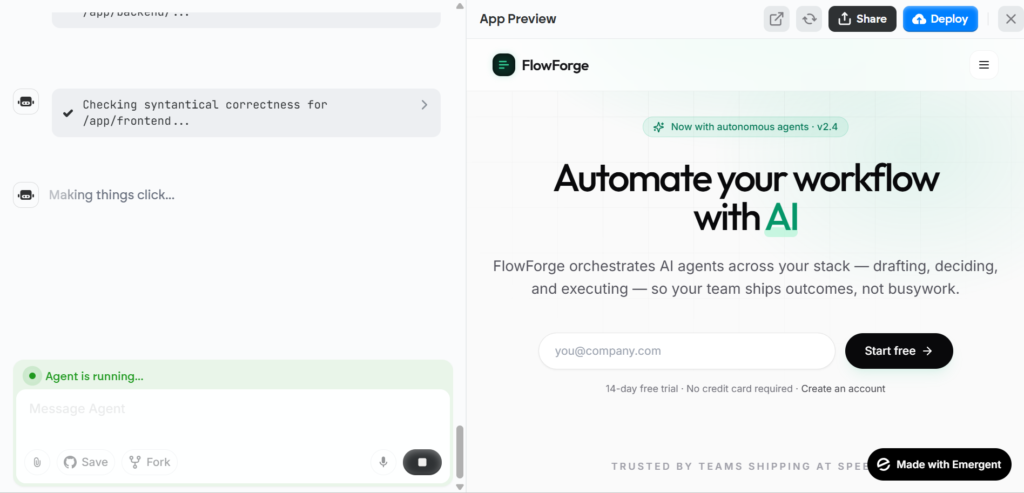
What the AI Is Actually Doing: One of the most important things to understand when learning how to use Emergent AI is that it is not using templates. It is writing real code — frontend components, backend routes, database schemas, and API logic — all generated from your plain English description. That is why the result is so much more powerful than any drag-and-drop builder.
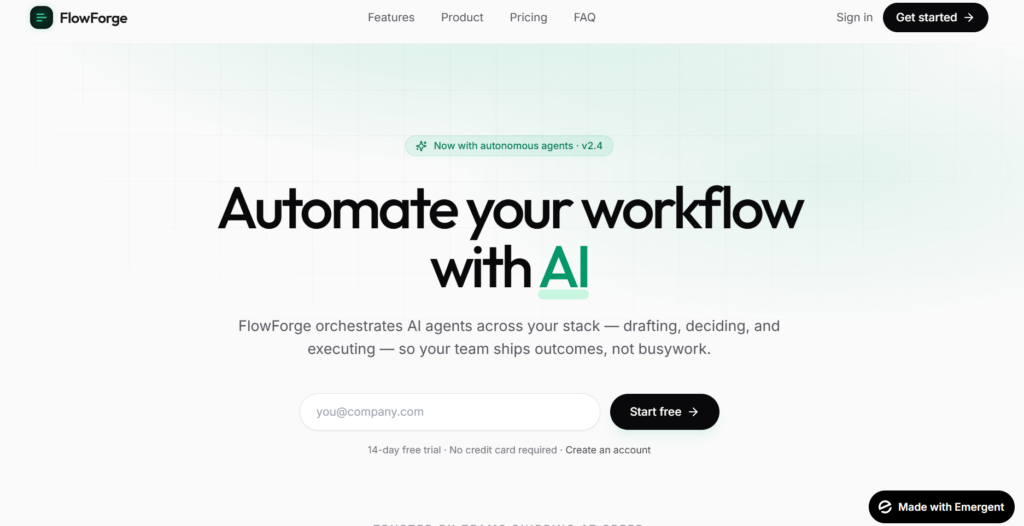
How to Use Emergent AI — Step 5: Preview and Review What Was Built
Once Emergent AI finishes generating your website, you will have a fully functional preview right inside your browser. This is the moment of truth — and honestly, most first-time users are completely blown away by how complete and professional the result looks.
How to review your build properly:
The live preview panel on the right shows your website exactly as visitors will see it
Click through every page and section — check that navigation works, buttons respond, and forms are visible
Toggle mobile view if a responsive preview option is available
Read the AI’s summary in the chat panel — it lists every page and feature it created for your site
Take notes on anything you want to change or add — you will fix those in the very next step
How to Use Emergent AI — Step 6: Refining Your Website With Follow-Up Prompts
Here is something that surprises almost every beginner when they first learn how to use Emergent AI: you do not edit your website by clicking and dragging things. Instead, you simply tell the AI what to change — right in the same chat window — and it updates the site for you.
This process is called iterative prompting, and it is one of the most powerful aspects of how to use Emergent AI effectively. Think of it as an ongoing conversation with a developer who implements every change instantly.
How to request changes:
Type your change request in the chat box at the bottom of the left panel
Be as specific as possible about what you want updated
Hit Enter and watch the AI apply the update to your site in real time
Review the preview and keep refining until you are completely happy
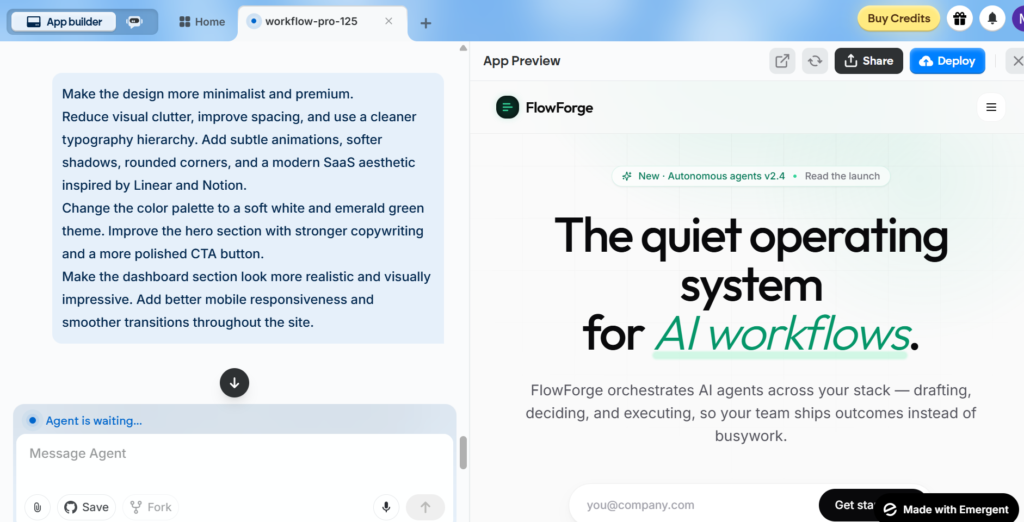
Examples of great refinement prompts when you use Emergent AI:
“Change the color palette to black and gold. Make it feel more premium and high-end.”
“Add a pricing section between the features section and the testimonials section.”
“Replace all placeholder text with real content for a graphic design business.”
“Make the navigation bar sticky so it follows the user as they scroll down the page.”
“Add a cookie consent popup that appears automatically on the user’s first visit.”
“Redesign the contact section. Put a map on the left side and the contact form on the right.”
Pro Tip — The Fork Feature: One of the most underrated things to know when learning how to use Emergent AI is the fork feature. Available on the Standard plan and above, forking creates a saved copy of your current project before you make changes. Always fork before attempting a major redesign — it is your safety net if something goes wrong.
When you use Emergent AI, you have access to a set of advanced controls that let you tune exactly how the AI builds your site. Most beginners can skip these initially and still get great results — but knowing what they do helps you unlock even better output as you grow more confident.
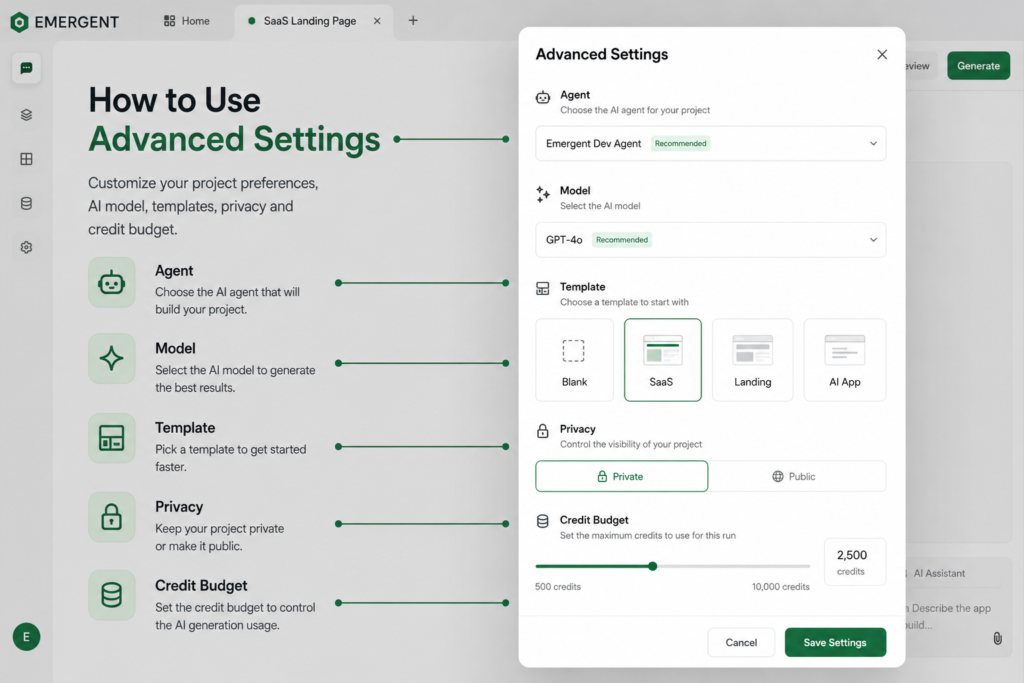
Agent Selector — How to Use Emergent AI’s Different Build Agents
E1 is the default full-stack agent and the best choice for most website builds. Faster variant agents have lower reasoning depth and are great for simple landing pages. Mobile-specific agents are optimized for mobile-first website builds. Recommendation: stick with E1 when you are just starting to learn how to use Emergent AI.
Model Selector — Choosing the Right AI Brain
Claude 4.0 Sonnet is fast, smart, and great for the majority of projects. Claude 4.0 Extended offers deeper reasoning for complex multi-page builds. Ultra Thinking mode is available on Pro plans only and gives maximum reasoning depth for enterprise-level websites.
Template Selection — Full-Stack Is Almost Always the Right Answer
When you use Emergent AI to build anything beyond a simple static page, always choose the Full-Stack template. This gives you authentication, database support, and backend infrastructure built in automatically from the very start.
Privacy Toggle
Private projects are only visible to you and require the Standard plan or above. Public or Shareable projects give anyone with the link access to view your build.
Credit Budget
Setting a credit budget before you start a build is smart practice when you use Emergent AI for experimental projects. It prevents runaway credit usage and keeps your costs fully predictable.
This is where learning how to use Emergent AI starts to feel genuinely magical. Once your website is built, you can add powerful third-party integrations through a single prompt — no plugins, no technical setup, no configuration files, no code.
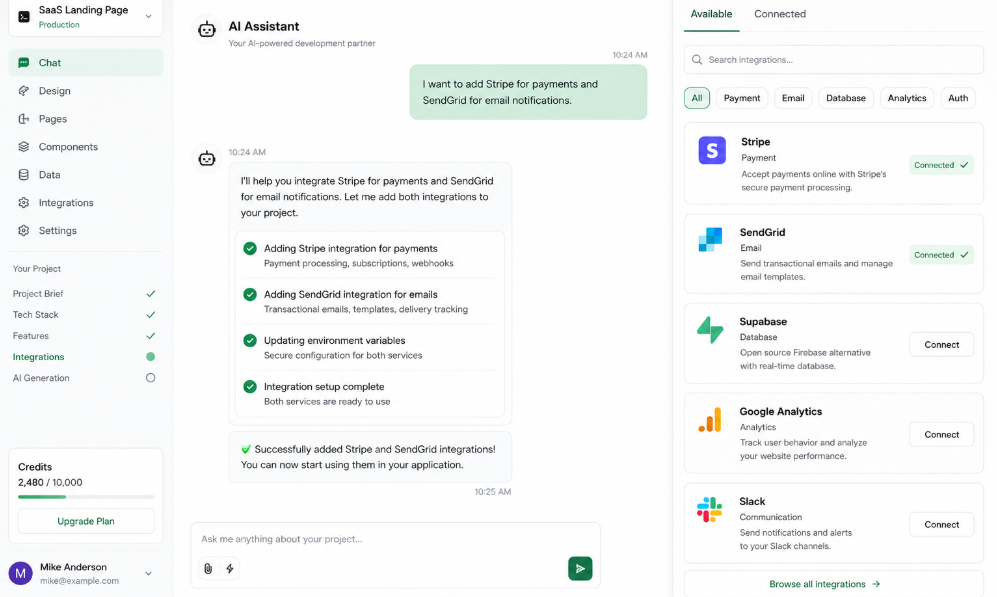
Here are the most useful integrations you can add simply by asking in the Emergent AI chat:
Supabase: Adds a full database, real-time data sync, and file storage to your website. Just type “Add Supabase as the backend database for this project” and Emergent AI handles the entire setup automatically.
User Authentication: Adds a complete login and signup system, user accounts, and protected pages. Just type “Add user authentication with Google login” and it is done in minutes.
Stripe Payments: Adds payment processing and subscription billing. Just type “Add Stripe payments for the pricing plans on this site” and Emergent AI wires up the entire payment flow.
Notion as CMS: Lets you manage your website content directly from Notion. Just type “Pull blog posts from my Notion database” and your site becomes a dynamic content-powered platform.
AI Chatbot: Adds an intelligent customer support chat widget to your site. Just type “Add an AI chatbot that can answer common customer questions.”
GitHub Sync: Connects your project to a GitHub repository so your code is always backed up. Just type “Connect this project to my GitHub account.”
According to the Emergent documentation at emergent.sh/tutorial, these integrations can be configured without any technical knowledge whatsoever. That is the real power of knowing how to use Emergent AI at a deeper level.
How to Use Emergent AI — Step 9: Running a Pre-Deployment Health Check
Before you make your website live, Emergent AI runs a smart automated health check. Think of it as a final code review — the AI scans your entire project for broken connections, missing environment variables, database configuration issues, and security vulnerabilities.
This step is crucial when you use Emergent AI for any serious website. It regularly catches things you would never spot on your own.
How to run the health check:
Find the Deploy or Go Live button in the top right corner of your project screen
Before clicking Deploy, click “Run Health Check” first
The AI scans your entire codebase and returns a clear pass or fail result for each check
If anything fails, type the specific issue into the chat box and ask the AI to fix it
Re-run the health check until every single item shows a green pass
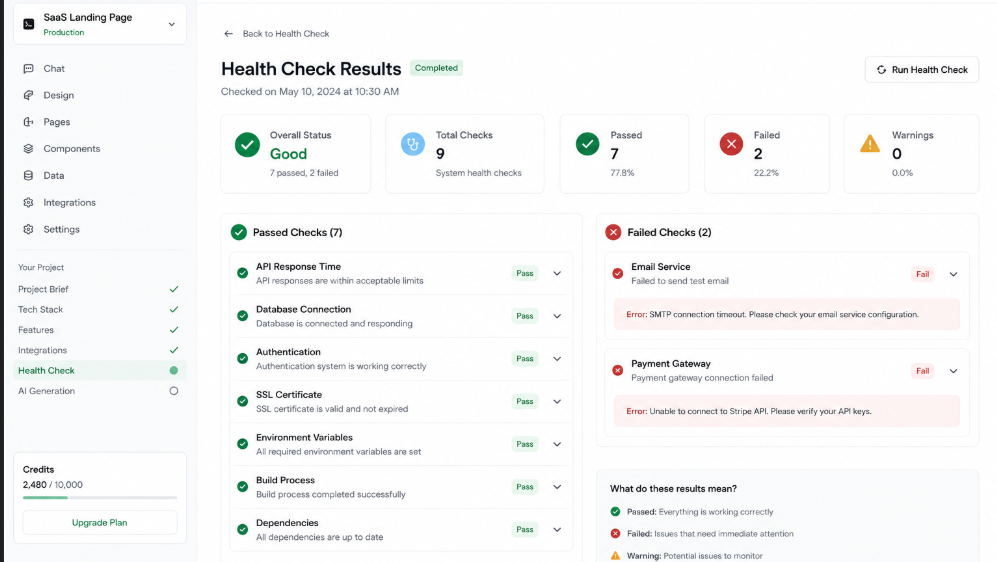
Important: The health check itself uses credits. Make sure you have enough credits remaining before running it. Do not skip this step — deploying without a health check when you use Emergent AI can result in a broken live site that is difficult to diagnose after the fact.
How to deploy your website with Emergent AI:
After the health check passes fully, click the Deploy button
Emergent AI generates a preview subdomain first — a temporary shareable link you can use to demo your site to others or test it across different devices and screen sizes
When you are fully satisfied, confirm the full production deployment
Watch the step-by-step deployment status in real time — you will see each stage complete one by one
Once finished, you receive your live URL — ready to share, bookmark, and promote
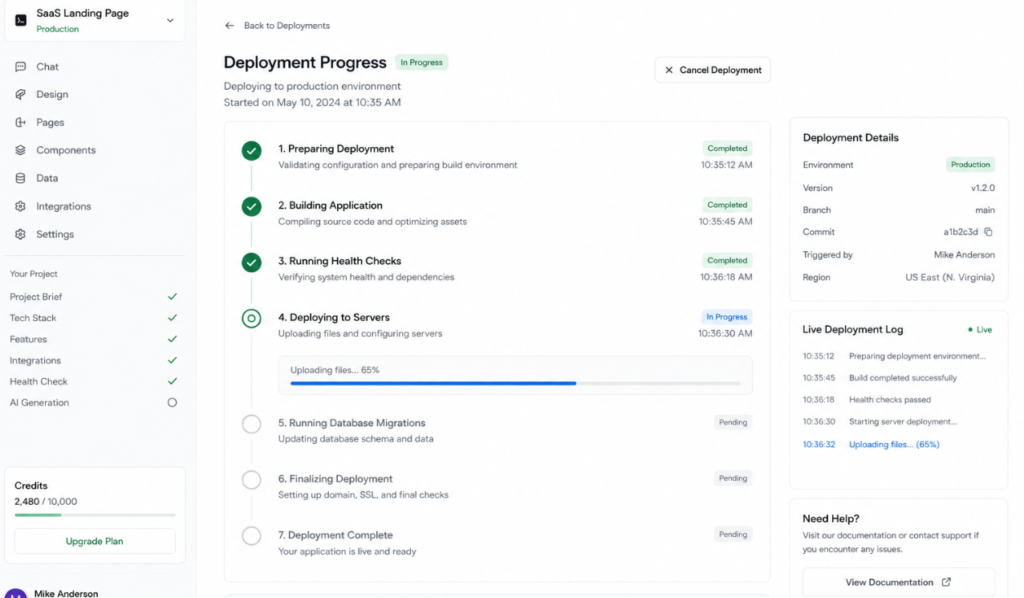
What Emergent AI Handles Automatically at Deployment: Hosting setup, server configuration, SSL certificate for HTTPS, database connection, environment variables, and CDN routing. In traditional website development, this process alone would take a developer several hours. When you use Emergent AI, it happens automatically in minutes.
How to Use Emergent AI — Step 11: Connecting a Custom Domain
When you use Emergent AI to deploy your site, you automatically get a free subdomain. But for a truly professional online presence, you will want your own custom domain — like yourbusiness.com instead of yourbusiness.emergent.app.
How to connect your domain after you use Emergent AI to build your site:
In your project settings, find the “Custom Domain” or “Domain Settings” section
Enter your domain name. You will need to have purchased it from a registrar. Popular options include Namecheap (namecheap.com), Google Domains, or GoDaddy
Emergent AI will provide you with specific DNS records to add — typically a CNAME record or an A record
Log into your domain registrar account, navigate to DNS settings, and add exactly the records Emergent AI provides
DNS changes typically take anywhere from a few minutes to a few hours to fully propagate across the internet
Once propagation is complete, your site loads perfectly on your custom domain with full HTTPS encryption applied automatically
Tip: If you have not purchased a domain yet, Namecheap at namecheap.com offers domains from as little as $1 to $12 per year. Choose something short, memorable, and directly relevant to your brand or business name.
Pro Tips for Getting the Best Results When You Use Emergent AI
After studying thousands of Emergent AI builds, here is what separates websites that look genuinely professional from ones that feel generic and forgettable. These are the habits of people who truly master how to use Emergent AI.
Pro Tip 1 — Describe Your Audience, Not Just Your Product
Instead of “make a fitness website,” say “make a fitness website for busy working mothers who want effective 20-minute home workouts with no equipment.” When you use Emergent AI with audience-specific prompts, the AI writes better copy and designs better layouts automatically.
Pro Tip 2 — Reference Real Websites for Visual Style
Mention design references in your prompt such as “Clean minimal design similar to Apple.com” or “Bold colorful layout inspired by Notion.so.” Emergent AI uses these references to guide visual and typography decisions in the right direction.
Pro Tip 3 — Build in Stages for the Cleanest Results
One of the most important lessons in how to use Emergent AI effectively is to build incrementally. Get a polished homepage first. Then add inner pages. Then layer in integrations. Trying to describe a 10-page website with authentication, payment processing, and an AI chatbot all in one prompt often produces inconsistent results.
Pro Tip 4 — Always Fork Before Making Big Changes
Before any major redesign or structural change, fork your project. This saves a snapshot of your current working version so you can roll back instantly if you do not like the result. This single habit will save you enormous frustration as you continue learning how to use Emergent AI.
Pro Tip 5 — Ask the AI to Summarize What It Built
Not sure what the AI created? Type this into the chat: “Give me a complete summary of every page and feature you built in this project.” The AI provides a full structured breakdown — incredibly useful for understanding complex builds.
Pro Tip 6 — Set a Credit Budget for Every Experimental Build
Whenever you are testing a new idea or exploring what is possible with Emergent AI, set a low credit limit in Advanced Settings before you start. This keeps your costs completely predictable and prevents accidental overspending during exploratory sessions.
Pro Tip 7 — Be Intentional With Every Iteration
The ability to make unlimited changes is one of the most powerful aspects of how to use Emergent AI — but it is also where beginners waste the most credits. Before each refinement session, write down exactly what you want to change. Vague prompts like “make it better” or “improve the design” waste credits without producing meaningful improvements.
Emergent AI Pricing — What Is Free and What Is Paid in 2026?
Now that you know how to use Emergent AI from start to finish, let us talk about what it actually costs. Emergent uses a credit-based pricing system where every AI action — generating, editing, and deploying — costs a certain number of credits.
Free Plan: $0 per month. Includes 10 credits per month. Gives you access to all core features, all AI models, and both web and mobile builds. No private project hosting. Best for exploring how to use Emergent AI before committing.
Standard Plan: $20 per month. Includes 100 credits per month. Adds private project hosting, GitHub integration, and the fork task feature. Enough credits to ship 1 to 2 solid projects per month. This is where most individuals start when they seriously learn how to use Emergent AI.
Pro Plan: $200 per month. Includes 750 credits per month. Best per-credit rate at approximately $0.27 per credit. Includes Ultra Thinking mode and priority support. Best for agencies and teams shipping multiple projects monthly.
Team Plan: $300 per month. Includes 1,250 shared credits across your entire team. Adds team collaboration features and admin controls. Best for businesses using Emergent AI at scale.
How Credits Work in Practice: A simple landing page when you use Emergent AI costs roughly 10 to 20 credits to generate. A SaaS dashboard with authentication and a full database runs approximately 40 to 60 credits. Each deployment costs around 50 credits per deployment month. Annual billing is available across all paid plans and saves you up to 17 percent compared to monthly pricing.
Our Honest Recommendation: Start with the Free plan to get comfortable with how to use Emergent AI and explore the interface. When you are ready to build something real and launch it live, the Standard plan at $20 per month is the best starting point for individual creators and small business owners.
Real Websites You Can Build Once You Know How to Use Emergent AI
Here are the most popular real-world website types that people build every day once they learn how to use Emergent AI:
Portfolio website — Showcase your work as a designer, developer, writer, photographer, or any creative professional with a beautiful custom portfolio site.
Small business website — Restaurant, salon, gym, law firm, real estate agent, dental office, and more — Emergent AI handles them all with ease.
Online course landing page — Sell your knowledge with a high-converting course sales page complete with pricing, testimonials, and a signup form.
E-commerce store — Build a full online store with product listings, a shopping cart, and Stripe payment integration in a single session.
SaaS app landing page — Launch your software product with a clean, modern landing page and a waitlist or early access signup form.
Blog or content website — A full CMS-powered blog with categories, tags, search functionality, and an RSS feed.
Internal team dashboard — Productivity tools, data visualization panels, and admin interfaces for your team or business operations.
AI-powered web tool — Build your own AI tool with an integrated chatbot, content generator, or recommendation engine powered by leading AI models.
Your Website Is One Prompt Away
Now you know exactly how to use Emergent AI from the very first step all the way through to a live, deployed, custom-domain website.
Let us be honest for a moment — building a website used to be one of the most intimidating things a non-technical person could attempt. It was expensive. It was slow. And it was full of moments where you felt completely stuck with no idea how to move forward.
Knowing how to use Emergent AI changes all of that. You bring the idea. The AI brings the skills. Together, you build something real — in one afternoon instead of one month.
Go check out the original video by Mindly Nova on YouTube for a complete live visual walkthrough of everything covered in this guide: https://youtu.be/fEzPtMmaBH0
Have questions about how to use Emergent AI? Drop them in the comments below. And if you have already built something with Emergent, share your live website URL — we would love to see what you created.
Happy building!
Frequently Asked Questions About How to Use Emergent AI
Do I need coding experience to use Emergent AI?
No. Learning how to use Emergent AI requires zero coding experience. You describe what you want in plain English and the AI writes all the code automatically. It is genuinely built for complete beginners.
How is Emergent AI different from Wix or Squarespace?
Wix and Squarespace are drag-and-drop template builders suitable for simple static websites. When you use Emergent AI, you get a real production-grade web application with backend logic, a database, and authentication — far more powerful than any template-based tool.
Can I export the code that Emergent AI generates?
Yes. One of the best things about knowing how to use Emergent AI is that you own all the code it generates. You can export it anytime or connect it to a GitHub repository to keep it synced automatically. You are never locked into the platform.
How long does it take to build a website when you use Emergent AI?
A simple landing page generates in 2 to 5 minutes. A more complex multi-page site with authentication and a database might take 10 to 20 minutes of generation and review time. Most people go from first prompt to live deployment in under one hour when they know how to use Emergent AI properly.
What happens if I run out of credits on Emergent AI?
Your project is saved and remains fully accessible. You simply cannot make new AI-powered changes until your credits reset at the start of the next billing cycle. Pro plan users can purchase additional credits at any time without upgrading their plan.
Is Emergent AI good for beginners?
Absolutely. How to use Emergent AI is one of the most beginner-friendly processes in the world of website creation today. If you can describe what you want in a sentence, you can build a website with Emergent AI.
Leave a Reply